ROOT POROSITY

DEFECT WELD
NON VISUAL


ROOT POROSITY

Root Porosity

Because :
1. The condition of the root damp or moist.
2. Electrode moist
3. Purging gas contaminated ( GTAW )
4. No purging gas ( GTAW )

Result :
1. Weaken Connection weld.
2. Started erosion abrasion.
3. Started INTERNAL CORROSION.

Countermeasures :
1. Gouging until roots in the location of a defect in the welds and appropriate contents WPS REPAIR.

Rejected Criteria
1. INDIVIDUAL more than 1/8 “ or 25 % minimum thick .
2. The distribution of goods more than the stipulated API 1104 picture 15 and 16.
3. For Cluster Porosity diameter more than 1/2 “ , total length porosity 12 “ Welding more than 1/2 “
 

INCOMPLETE PENETRATION (IP)

DEFECT WELD
NON VISUAL

INCOMPLETE PENETRATION


INCOMPLETE PENETRATION

Because :
1. GAP too narrow
2. Ampere root low
3. Welding machine not Calibration
4. The electrodes up and down
5. GAP dirty

Result :
1. Notch potential crack.
2. weaken weld joint.
3. Started erosion abrasion.

Countermeasures :
1. Gouging until roots in the location of a defect in the welds and appropriate contents WPS REPAIR.

Rejected Criteria
  • API 1104 : 1. INDIVIDUAL > 1 “ , 2. Total length 12 “ welding > 1 “ , total length of weld 12 “ length weld > 8% length weld.
  • If IP potential HIGH LOW : 1If side of the root of open > 2” ( INDIVIDUAL ) , 2. In 12” length weld , total length > 3” .
Accepted Criteria
  • ANSI B 31.3 : 1. INDIVIDUAL ≤ 1 mm ( 1/32 “ ) and ≤ 0.2 X weld thicknes normal . 2. Total length of weld 6 “ ≤ 38 mm ( 1 ½ “ )
 

EXCESS WIRE

DEFECT WELD 
NON VISUAL 

EXCESS WIRE 

EXCESS WIRE 


Because :
1. WELDING WIRE COROTION
2. WIRE FEEDER NOT NORMAL .
3. Electricity supply disconnected breaking up

Result :
1. NOTCH POTENTIAL CRACK.
2. DAMAGE CLEANING PIG

Countermeasures :
1. Gouging until roots in the location of a defect in the welds and appropriate contents WPS REPAIR.

Rejected Criteria  :
Rejected its existence
 

ROOT UNDERFILL

DEFECT WELD
NON VISUAL


ROOT UNDERFILL
ROOT UNDERFILL


Because :
1. Gap dirty..
2. Ampere root low.
3. Temp metal cold.
4. HIGH LOW.

Result :
1. Notch potential crack.
2. Damage cleaning pig.

Countermeasures :
1. Gouging until roots in the location of a defect in the welds and appropriate contents WPS repair.

Rejected Criteria
API 1104 : If the number of a length of more than 2 “ in 12” Long welds or the length of more than ¼ long welds overall, Reject .

Accepted Criteria
ANSI B31.3 : for normal category , SEVERE CYCLIC and category D , LONGITUDINAL GOOVE don’t have UNDERCUT , for branch connection ≤ 1 mm ( 1/32 “ ) and ≤ ¼ thick normal weld.
 

ROOT UNDERCUT

DEFECT WELD
NON VISUAL

ROOT UNDERCUT
 ROOT UNDERCUT


Because :
1. Temp metal too high.
2. Ampere root too high.
3. SPEED ROOT too low.


Result :
1. Weaken connection dilokasi defect.
2. Started erosion abrasion.
3. Voltage sliding inflict a potentially crack


Countermeasures :
1. Gouging until roots in the location of a defect in the welds and appropriate contents WPS REPAIR.


Rejected Criteria
API 1104 : If the number of a length of more than 2 “ in 12” Long welds or the length of more than ¼ long welds overall, Reject .

Accepted Criteria
ANSI B31.3 : for normal category , SEVERE CYCLIC and category D , LONGITUDINAL GOOVE don’t have UNDERCUT , for branch connection ≤ 1 mm ( 1/32 “ ) and ≤ ¼ thick normal weld.
 

BLOW HOLE

DEFECT WELD
NON VISUAL


BLOW HOLE

Blow Hole


Because :
1. ELEKTRODA UP DOWN
2. GAP NO CONSISTENT
3. AMPERE ROOT SWING

Result :
Started erosion abrasion.

Countermeasures :
1. Gouging until roots in the location of a defect in the welds and appropriate contents WPS REPAIR.

Rejected Criteria
API 1104 : For the use of normal or SEVERE CYCLIC must repair, if not , it’s reject. In the d is still could be accepted as long as :
1. INDIVIDUAL ≤ 1/4 “ or thick plate .
2. If the number of long in 12” lasan < ½ “.
 

EXCESSIVE REINFORCEMENT

DEFECT WELD
VISUAL

EXCESSIVE REINFORCEMENT

EXCESSIVE REINFORCEMENT

Because :
1. TEMP METAL LOW.
2. AMPER CAPPING LOW.
3. SPEED CAPPING LOW.
4. COLD ENVIROVMENT.

Result :
1. A rising suspicion that all the lanes of the welds ampère with low.
2. Perhaps conditions internal the welds good enough but needs to be investigated further.

Countermeasures :
1. NDT test using method RT or UT ( STRAIGHT ATAU ANGLE PROBE ). If the result is proving that suspicion , and all the problems in unloading and repair welding as WPS. Welder change to QUALIFIED.
2. If the result of the test ndt show the condition internal the welds good , so the prominent sufficient in burrs to uniform and in accordance standard.

Rejected Criteria
Rejected or accepted refrain to Conditional depends the test N.D.T. If all the lanes of welds with ampère low, the welds been rejected, and but if qualified the received on the condition protrusion on standard.


Noted :
The height REINFORCEMENT welding, MAXIMUM look HIGH LOW ( ANSI B 31.3 ) .
 

ROOT CRACKS

DEFECT WELD
NON VISUAL

ROOT CRACKS

 ROOT CRACKS

Because :
1. NOTCH.
2. STRESS.
3. C equivalent < 0.41 %
4. STRESS RELIEF .
5. MARTENSIT DI H.A.Z.
6. CRYSTAL GROWTH.
7. FERRITE < 5% and > 12 % STAINLESS STEEL .
8. REHEAT CRACK .
9. STRESS CORROSION CRACKING ( S.C.C ) ,Cl2 , S, H2 , CAUSTIC.
10. SHRINKAGE.

Result
1. FATAL

Countermeasures :
1. Do it FAILURE ANALYSIS To determine the cause of crack accurately.
2. If crack are in the welds, GAOUGING . setting again and repair weld as WPS REPAIR.
3. If crack are out the welds , so all material(base metal) replace to a new.

Rejected Criteria
1. Cracked a star considered not dangerous unless if to exceed 5/32 “ length.
2. A kind of crack other all rejected.


CRACK

DEFECT WELD
VISUAL

CRACK
CRACK


Because :
1. NOTCH.
2. STRESS.
3. C equivalent < 0.41 %
4. STRESS RELIEF .
5. MARTENSIT DI H.A.Z.
6. CRYSTAL GROWTH.
7. FERRITE < 5% and > 12 % STAINLESS STEEL .
8. REHEAT CRACK .
9. STRESS CORROSION CRACKING ( S.C.C ) ,Cl2 , S, H2 , CAUSTIC.
10. SHRINKAGE.

Result
1. FATAL

Countermeasures :
1. Do it FAILURE ANALYSIS To determine the cause of crack accurately.
2. If crack are in the welds, GAOUGING . setting again and repair weld as WPS REPAIR.
3. If crack are out the welds , so all material(base metal) replace to a new.

Rejected Criteria
1. Cracked a star considered not dangerous unless if to exceed 5/32 “ length.
2. A kind of crack other all rejected.
 

EXCESSIVE PENETRATION

DEFECT WELD
NON VISUAL

EXCESSIVE PENETRATION

EXCESSIVE PENETRATION


Excess weld metal protruding through the root of a fusion (butt) weld made from one side only.

With pipe welding this type of imperfection may cause effects in the fluid flow that can cause erosion and/or corrosion problems.


Common causes
Penetration becomes excessive when the joint gap is too large, the root faces are too small, the heat input to the joint is too high or a combination of these causes.


Acceptance
The criteria which sets the level of acceptable penetration depends primarily on the application code or specification.


  • BS 2971 (Class 2 arc welding) requires that the 'penetration bead shall not exceed 3mm for pipes up to and including 150mm bore or 6mm for pipes over 150mm bore'.
  • BS 2633 (Class 1 arc welding) gives specific limits for smaller diameters pipes, eg for pipe size 25-50mm the maximum allowed bore penetration is 2.5mm.
  • ASME B31.3 bases acceptability on the nominal thickness of the weld, for instance, allowing for a thickness range of 13-25mm up to 4mm of protrusion. However, ASME notes that 'more stringent criteria may be specified in the engineering design'.
  • BS EN ISO 5817 (Quality levels for imperfections), which supersedes BS EN 25817, relates the acceptable protrusion to the width of the under-bead as follows:


Avoidance
It is important to ensure that joint fit-up is as specified in the welding procedure. If welder technique is the problem then re training is required.
 

ROOT CONCAVITY

DEFECT WELD

NON VISUAL

ROOT CONCAVITY

ROOT CONCAVITY

Because :
1. Gap too wide
2. SPEED ROOT too high .
3. AMPERE ROOT high
4. ELEKTRODA too big.
5. For STAINLESS STEEL ROOT GTAW In override in topped with GTAW So that root melted again and sucked up by the process of caping.


Result
1. Started erosion abrasion.
2. S.C.C ( CL2 , NaOH ).
3. weaken weld join .


Countermeasures :
1. GOUGING until the root , setting again and repair welding as WPS Repair.


Rejected Criteria
API 1104 :
1) IF INDIVIDUAL > ¼ INCI,
2) SEPANJANG TEBAL PIPA ,
3) all length welding 12” > ½ “ .


ANSI B 31.3 : The depth of root concavity acceptable when the number of connection plus welding reinforcement > thick nominal ( T W ) b). in 12” length weld > 3inch
 

HIGH LOW

DEFECT WELD
(VISUAL) 

HIGH LOW


High Low

Because :
1. Any setting
2. Different thick

Result :
1. Started erosion abrasion.
2. Producing a voltage sliding potential to crack

Countermeasures :
1. The prominent part in an oblique 1 : 3 ( ASME VIII ) 1 ; 2.5 ( ANSI B31.3 )

Rejected Criteria
1 ANSI B31.3 : t ≤ ¼ “ max. 1.5 mm ( 1/16 “ ) EXTERNAL t > ¼ ~ ≤ 13 mm ( ½ “ ) , max. 3 mm ( 1/8” )t > 13 mm ( ½ “ ) ~ ≤ 25 mm ( 1” ) ,max 4 mm ( 5/32 “ ) t > 25 mm ( 1 “ ) , max 5 mm ( 3/16 “ )
INTERNAL = 2 X EXTERNAL exceeds the maximum mentioned above, if no do it, rejected

2. API 1104 :

a). If any side of weld opened >2inch individual.
b). in 12” length weld > 3inch
 

STOP START

DEFECT WELD
(VISUAL)

STOP START
stop start


Because :
  • Bulge recurring caused by replacement electrodes too backward so there overlapping prominent.
  • The empty without capping in a recurrent manner caused by the replacement of electrodes too forward.

Result
1. THE STANDOUT LOOKS BAD AND INEFFICIENT
2. That empty inflict NOTCH Potentially crack.

Countermeasures :
1. Prominent grinding sufficient in to the standard
2. Thr empty grinding must be to rest of slag missing , then welds rearranged wps repair

Rejection criteria :
1 .To prominent recurring acceptable on the condition in burrs to the form of standard.
2 .To empty acceptable origin repaired by filling capping to the form of a welds uniform .If this mentioned above not carried out , the welds rejected
 

UNDERFILL

DEFECT WELD
(VISUAL)

UNDERFILL
Underfill


Because
1. Metal temperatures too low.
2. Ampère capping too low.
3. Dirty.
4. Swing not fix.
5. HIGH LOW.

Result
1. arise NOTCH Potentially crack.
2. Weaken connection weld.
3. Started rust the surface.

Countermeasures :
Grinding until defect missing, Welds repeated according WPS repair.

Rejection criteria :
If defect weld not repaired , the welds is rejected.
 

UNDERCUT

DEFECT WELD
(VISUAL)

UNDERCUT
UNDERCUT


Because
1. Temperature metal too high .
2. Ampère capping high .
3. Speed capping too low

Result
1. Weaken connection.
2. Started rust the surface.
3 .Cause voltage sliding ( displacement stress ) potential to crack .

Countermeasures :
1. Enough clean up with wire brush and filling it with stringer ( welding lane single without swing according wps repair.

Rejection criteria :
1. The depth of more than 1/32 “or more than12 ½ % thick nominal material.
2. The depth of more than 1/64” to 1/32 “or more than 6% to 12 ½ % thick nominal material.
3. A length of more than 2 “ in 12 “ Welds or more than 1/6 length weld.
4. ROOT UNDER CUT more than 2” in 12 “ ROOT or more than 1/4 length ROOT .
 

SURFACE COLD LAP

DEFECT WELD
(VISUAL)

SURFACE COLD LAP
SURFACE COLD LAP

Because
1. Temperature metal low.
2. Capping ampère low.
3. Swing not fixed.
4. The surface of the material dirty.

Result
1. Is incomplete fusion Potentially crack.
2. Arising suspicion that all lane welds been implemented ampère low so as to lead to fusion between elementary substance with the welds or inter lane imperfect.

Countermeasures :
1. If suspicion not proved , then cold laps sufficient in grindstone with the uniform.
2. If suspicion proven and all the troubled demolished ,repair welding as WPS repair .
3. If it is still troubled,Change welder.

Rejection criteria :
The existence of surface cold laps were rejected and must be repaired.


INVERTEC® V155-S STICK WELDER (SMAW)

INVERTEC® V155-S STICK WELDER


Top Features
  • Two stick modes, SOFT and CRISP, provide the right arc characteristics for different types of electrodes.
  • Fan-As-Needed™ (F.A.N.™) reduces noise and dust inside the machine.
  • Auto-Adaptive Arc Force minimizes electrode sticking in the puddle without compromising arc stability or increased spatter.
  • Automatic Hot Start boosts the current during starting to make striking an arc easier.
  • Touch Start TIG® mode – it’s like getting a TIG welder for free!

Input Power
  • 115/230/1/50/60

Processes
  • Stick, DC TIG

Portable. Professional. Rugged. Affordable.


The Invertec® V155-S offers much more than you would expect from a welder this size. Weighing in at just under 15 lbs. (6.8 kg) the Invertec® V155-S is no lightweight contender. It packs the full punch of a heavyweight professional that you can take to the most demanding job sites. It features 120/230V auto reconnect operation and can operate from a portable generator. It can also plug into a 200 ft. (61 m) 230V extension cord so you can weld just about anywhere.


  • Two stick modes, SOFT and CRISP, provide the right arc characteristics for different types of electrodes. 
  • Fan-As-Needed™ (F.A.N.™) reduces noise and dust inside the machine. 
  • Auto-Adaptive Arc Force minimizes electrode sticking in the puddle without compromising arc stability or increased spatter. 
  • Automatic Hot Start boosts the current during starting to make striking an arc easier. 
  • Touch Start TIG® mode – it’s like getting a TIG welder for free!


RANGER® 305 G EFI FALL CAMO CASE ENGINE DRIVEN WELDER (KOHLER®)

Top Features


  • Kohler® Gasoline Engine - 25 HP EFI (Electronic Fuel Injection) for easier starts in cold weather and lower fuel use!
  • Multi-Process Welding - Excellent DC multi-process welding for general purpose stick, downhill pipe (stick), TIG, cored-wire, MIG (CO2 and mixed gas) and arc gouging.
  • Digital Weld Meters - makes it easy to precisely pre-set your procedures and monitor actual welding output.
  • Superior Arc Performance - Lincoln Chopper Technology® provides easy starts, a smooth arc, low spatter and excellent bead appearance.
  • Peak Single-Phase AC Generator Power for Motor Starting - 12,000 watts peak for motor starting

Processes

Stick, TIG, MIG, Flux-Cored

A WELDER FOR ALL SEASONS

Make the Ranger 305 G your portable welding station - general stick and downhill pipe, Touch Start™ TIG, MIG, and flux-cored wire capability. Choose the Ranger 305 G EFI (electronic fuel injection) for easier starts in cold weather and lower fuel consumption, with no choke starting required. The 9,500 watt continuous single-phase AC generator powers motors starting, tools and inverter welders for extended range and process capability.

Digital weld meters monitor actual welding output
12-gallon fuel capacity allows for extended operation
Electric fuel pump helps avoid vapor lock during high-altitude operation


Kohler® Gasoline Engine
  • 23 HP carburetor. 
  • 25 HP EFI (Electronic Fuel Injection) for easier starts in cold weather and lower fuel use! 
  • Both engines have electric fuel pump to avoid vapor lock at high altitude operation. 

Multi-Process Welding 
  • Excellent DC multi-process welding for general purpose stick, downhill pipe (stick), TIG, cored-wire and MIG (CO2 and mixed gas). 
  • Only compact gasoline welder in North America rated at 29V for 300 amps of stick or CV welding. 
  • CV wire welding with up to 5/64 in. (2.0 mm) diameter electrodes. 

Digital Weld Meters
  • Digital weld meters for amps and volts makes it easy to precisely pre-set your procedures and monitor actual welding output. 

Superior Arc Performance
  • Lincoln Electric Chopper Technology® – provides easy starts, a smooth arc, low spatter and optimal bead appearance. 

Peak Single-Phase AC Generator Power for Motor Starting
  • 10,500 watts peak, 12,000 for EFI. 
  • 9,500 watts continuous for high capacity needs such as a back-up generator, powering a Lincoln Electric Invertec® inverter welder. Also use for lights, a grinder or other power tools. 
  • AC generator voltage is constant at 120V or 240V at any weld dial setting. 

Skewed Rotor Design
  • Skewed rotor design provides AC power suitable for operating Lincoln Electric inverter power sources. Lincoln Electric was the first in the welding industry with this feature. 

Rugged Reliability
  • Welding and AC Generator Outputs rated at 104°F (40°C).
 

PIN HOLE

DEFECT WELD
(VISUAL)

PIN HOLE

PIN HOLE

Because
1. Formed for welding as gas: CO2 , CO , NO2 , SO2.
2. The wind getting into the area welds.

Result
The possibility of leak high at the defect.

Countermeasures :
Defect in gouging to roots welds, Then fills weld appropriate wps repair.

Rejection criteria :
The existence of defect Pin Hole rejected and must be repaired any size.
 

SURFACE CONCAVITY

DEFECT WELD 
(VISUAL)

SURFACE CONCAVITY 

SURFACE CONCAVITY


Because
:
  1. Angles openings joint too large. 
  2. Electrodes too small. 
  3. Ampère capping high. 
  4. Lane capping unfinished. 
  5. Speed capping too high
Result
  1. Weaken weld joint. 
  2. Started rust the weld profile. 
  3. Arising displacement stress potentially crack.
Countermeasures :
Directly finish lanes capping appropriate WPS .


Rejection criteria :
If are not repaired , the welds is rejected
 

POROSITY

DEFECT WELD 
(VISUAL)

POROSITY

Defect Weld : Porosity


Because :
1. Environmental wet or moist.
2. The galvaniize not yet been grinding .
3. Elektoda moist.
4. A rising gas when welding prosses.
5. Ampere capping too high .
6. The wind getting into the area welds.
7. Welding-joint dirty.

Result
1. Bad Profile.
2. Weaken weld joint.
3. Started rust the surface.

Countermeasures :
Grinding or gouging to defect missing, Welds repeated according WPS repair

Rejection criteria :
1. Individually to exceed 1/8” or 25% nominal thickness.
2. For cluster porosity Diameter more than ½”.

3. The number of long clusters in 12” weld more than ½”.
 

Spatters

DEFECT WELD
(VISUAL)

SPATTERS


Defect Weld : Spatters


Because :
1. Environmental wet or moist.
2. Elektoda moist.
3. The wind getting into the area welds.
4. The arc welding too long .
5. Capping current too high.
6. Kind of a current wrong.
7. Kinds of polarity wrong.
8. The galvaniize not yet been grinding.

Result :
1. Bad Profile
2. Started rust the surface
               
Countermeasures :
1 . Use chisel only or niggardly churlish .Do not use grindstone because it is going to take the base metal

Rejection criteria : If not cleared can cause rejection (Because it is not relevant with standard)
 

Category Defect Welds

Defect welds : 

Defect Weld on Pipe.

1 Visual :

2. Non Visual :
  • Root Porosity
  • Root Concavity
  • Root Cracks
  • Blow Hole
  • Incomplete Penetration
  • Excessive Penetration
  • Excess Wire
  • Root Undercut
  • Root Underfill

3. Internal :

  • Slag Inclusion
  • Slag Lines
  • Internal Porosity
  • Worm Holes
  • Internal Cold Lap
  • Incomplete Fusion
  • Internal Crack
  • Hollow Bead
  • Aligned Porosity
  • Heavy Metal Inclusion


DEFECT WELDS

DEFECT WELDS


A defect of the welds is a circumstance where the results of welding there is a decrease in the quality of the results of the welds .The quality of the outcome of the welds was defined as in the form of a decline in the the power compared with the strength of material basemetal the base , not good news the performance of an outcome las or may be too high in the form of the power of the results of the welds so it does not appropriate for the demands the power of a construction .


The defect welds this will result in many things that are not unwanted and leads to a decline in the level of occupational safety, good safety instrument, workers, environment and companies. In addition also economically will result in an upsurge in production costs and will result in a loss.According to american socety the mechanical of engineers ( asme ), cause defect welds can be split into several factors among other :

  • The less support at work location
  • Human Error
  • Technique Welding 
  • Material


Defect welds consisting of 3 way check

1. Visual
2. Non Visual
3. Internal
 

Vickers Test

Vickers Test
The Vickers (HV) test was developed in England is 1925 and was formally known as the Diamond Pyramid Hardness (DPH) test. The Vickers test has two distinct force ranges, micro (10g to 1000g) and macro (1kg to 100kg), to cover all testing requirements. The indenter is the same for both ranges therefore Vickers hardness values are continuous over the total range of hardness for metals (typically HV100 to HV1000). With the exception of test forces below 200g, Vickers values are generally considered test force independent. In other words, if the material tested is uniform, the Vickers values will be the same if tested using a 500g force or a 50kg force. Below 200g, caution must be used when trying to compare results.

STANDARDS

Vickers test methods are defined in the following standards:
  • ASTM E384 - micro force ranges - 10kg to 1kg
  • ASTM E92 - macro force ranges - 1kg to 100kg
  • ISO 6507- 1,2,3 - micro and macro ranges

VICKERS TEST METHOD

All Vickers ranges use a 136° pyramidal diamond indenter that forms a square indent.


  • The indenter is pressed into the sample by an accurately controlled test force.
  • The force is maintained for a specific dwell time, normally 10 – 15 seconds.
  • After the dwell time is complete, the indenter is removed leaving an indent in the sample that appears square shaped on the surface.
  • The size of the indent is determined optically by measuring the two diagonals of the square indent.
  • The Vickers hardness number is a function of the test force divided by the surface area of the indent. The average of the two diagonals is used in the following formula to calculate the Vickers hardness.

HV = Constant x test force / indent diagonal squared


The constant is a function of the indenter geometry and the units of force and diagonal. The Vickers number, which normally ranges from HV 100 to HV1000 for metals, will increase as the sample gets harder. Tables are available to make the calculation simple, while all digital test instruments do it automatically. A typical Vickers hardness is specified as follows:

356HV0.5

Where 356 is the calculated hardness and 0.5 is the test force in kg.
APPLICATIONS

Because of the wide test force range, the Vickers test can be used on almost any metallic material. The part size is only limited by the testing instrument's capactiy

Strengths
  • One scale covers the entire hardness range
  • A wide range of test forces to suit every application
  • Nondestructive, sample can normally be reused

Weaknesses
  • The main drawback of the Vickers test is the need to optically measure the indent size. This requires that the test point be highly finished to be able to see the indent well enough to make an accurate measurement
  • Slow. Testing can take 30 seconds not counting the sample preparation time
 

Rockwell Hardness Test

Rockwell Hardness Test
Stanley P. Rockwell invented the Rockwell hardness test. He was a metallurgist for a large ball bearing company and he wanted a fast non-destructive way to determine if the heat treatment process they were doing on the bearing races was successful. The only hardness tests he had available at time were Vickers, Brinell and Scleroscope. The Vickers test was too time consuming, Brinell indents were too big for his parts and the Scleroscope was difficult to use, especially on his small parts.

To satisfy his needs he invented the Rockwell test method. This simple sequence of test force application proved to be a major advance in the world of hardness testing. It enabled the user to perform an accurate hardness test on a variety of sized parts in just a few seconds.


Rockwell test methods are defined in the following standards:

  • ASTM E18 Metals
  • ISO 6508 Metals
  • ASTM D785 Plastics

TYPES OF THE ROCKWELL TEST

There are two types of Rockwell Tests:
  1. Rockwell: the minor load is 10 kgf, the major load is 60, 100 or 150 kgf.
  2. Superficial Rockwell: the minor load is 3 kgf and major loads are 15, 30, or 45 kgf.

In both tests, the indenter may be either a diamond cone or steel ball, depending on the characteristics of the material being tested.

ROCKWELL SCALES

Rockwell hardness values are expressed as a combination of a hardness number and a scale symbol representing the indenter and the minor and major loads. The hardness number is expressed by the symbol HR and the scale designation.

There are 30 different scales. The majority of applications are covered by the Rockwell C and B scales for testing steel, brass, and other metals. However, the increasing use of materials other than steel and brass as well as thin materials necessitates a basic knowledge of the factors that must be considered in choosing the correct scale to ensure an accurate Rockwell test. The choice is not only between the regular hardness test and superficial hardness test, with three different major loads for each, but also between the diamond indenter and the 1/16, 1/8, 1/4 and 1/2 in. diameter steel ball indenters.
If no specification exists or there is doubt about the suitability of the specified scale, an analysis should be made of the following factors that control scale selection:


  • Type of material
  • Specimen thickness
  • Test location
  • Scale limitations

PRINCIPAL OF THE ROCKWELL TEST


  • The indenter moves down into position on the part surface
  • A minor load is applied and a zero reference position is established
  • The major load is applied for a specified time period (dwell time) beyond zero
  • The major load is released leaving the minor load applied


The resulting Rockwell number represents the difference in depth from the zero reference position as a result of the application of the major load.

APPLICATIONS

With the two test ranges available, the Rockwell test can be used on almost any metal sample as well as some hard plastics. The test can normally be performed in less than 10 seconds and the indent is usually small enough to allow the part to be used. Some parts with a critical hardness specification are tested 100%.

Weaknesses

  • Multiple test scales (30) needed to cover the full range of metal hardness
  • Conversions between scales can be material dependent
  • Samples must be clean and have a smooth test point to get good results

Strengths

  • Rapid test, usually less than 10 seconds
  • Direct readout, no questionable optical measurements required
  • Non-destructive, part normally can be reused


Knoop Test


Knoop Test

Knoop (HK) hardness was developed by at the National Bureau of Standards (now NIST) in 1939. The indenter used is a rhombic-based pyramidal diamond that produces an elongated diamond shaped indent. Knoop tests are mainly done at test forces from 10g to 1000g, so a high powered microscope is necessary to measure the indent size. Because of this, Knoop tests have mainly been known as microhardness tests. The newer standards more accurately use the term microindentation tests. The magnifications required to measure Knoop indents dictate a highly polished test surface. To achieve this surface, the samples are normally mounted and metallurgically polished, therefore Knoop is almost always a destructive test.

STANDARDS

Knoop test methods are defined in ASTM E384

KNOOP TEST METHOD

Knoop testing is done with a rhombic-based pyramidal diamond indenter that forms an elongated diamond shaped indent.


The indenter is pressed into the sample by an accurately controlled test force
The force is maintained for a specific dwell time, normally 10 - 15 seconds.
After the dwell time is complete, the indenter is removed leaving an elongated diamond shaped indent in the sample.
The size of the indent is determined optically by measuring the longest diagonal of the diamond shaped indent.
The Knoop hardness number is a function of the test force divided by the projected area of the indent. The diagonal is used in the following formula to calculate the Knoop hardness.


HK = Constant X test force / indent diagonal squared


The constant is a function of the indenter geometry and the units of force and diagonal. The Knoop number, which normally ranges from HK 60 to HK1000 for metals, will increase as the sample gets harder. Tables are available to make the calculation simple, while all digital test instruments do it automatically. A typical Knoop hardness is specified as follows:

450HK0.5
Where the 450 is the calculated hardness and 0.5 is the test force in kg.

APPLICATIONS

Because of the wide test force range, the Knoop test can be used on almost any metallic material. The part size is only limited by the testing instrument's capacity.

Strengths

  • The elongated diamond indenter and low test forces allows testing very small parts or material features not capable if being tested any other way.
  • One scale covers the entire hardness range.
  • Test results a mainly test force independent over 100g.
  • A wide range of test forces to suit every application.

Weaknesses

  • The main drawback of the Knoop test is the need to optically measure the indent size. This requires that the test point be highly polished to be able to see the indent well enough to make an accurate measurement.
  • Slow. Testing can take 30 seconds not counting the sample preparation time.
 

Leeb Hardness Test

Leeb Hardness Test

The Leeb (also known as an Equotip) test is a modern electronic version of the Scleroscope. It uses a carbide ball hammer that is spring rather than gravity powered. An electronic sensor measures the velocity of the hammer as it travels toward and away from the surface of the sample. The Leeb value is the hammer's rebound velocity divided by the impact velocity times 1000. The result is Leeb hardness from 0 to 1000 that can be related to other hardness scales such as Rockwell and Vickers.

Since the devise is electronic in nature, most instruments are designed to automatically convert from the Leeb number to a more conventional hardness scale. By using a variety of different conversions to suit the modulus of different materials, a wide range of metallic parts can be tested. The main limitations are that the parts must have a good finish and a minimum weight of 5kg. Leeb testers are portable and can be used at different angles as long as they are perpendicular to the test surface.

STANDARDS

Leeb test methods are defined in the ASTM A 956 standard.
 

Brinell Hardness Test

Brinell Hardness Test


Dr. J. A. Brinell invented the Brinell test in Sweden in 1900. The oldest of the hardness test methods in common use today, the Brinell test is frequently used to determine the hardness of forgings and castings that have a grain structure too course for Rockwell or Vickers testing. Therefore, Brinell tests are frequently done on large parts. By varying the test force and ball size, nearly all metals can be tested using a Brinell test. Brinell values are considered test force independent as long as the ball size/test force relationship is the same.

In the USA, Brinell testing is typically done on iron and steel castings using a 3000Kg test force and a 10mm diameter carbide ball. Aluminum and other softer alloys are frequently tested using a 500Kg test force and a 10 or 5mm carbide ball. Therefore the typical range of Brinell testing in this country is 500 to 3000kg with 5 or 10mm carbide balls. In Europe Brinell testing is done using a much wider range of forces and ball sizes. It's common in Europe to perform Brinell tests on small parts using a 1mm carbide ball and a test force as low as 1kg. These low load tests are commonly referred to as baby Brinell tests.

STANDARDS

Brinell Test methods are defined in the following standards:

ASTM E10
9SO 6506

BRINELL TEST METHOD

All Brinell tests use a carbide ball indenter. The test procedure is as follows:

  • The indenter is pressed into the sample by an accurately controlled test force.
  • The force is maintained for a specific dwell time, normally 10-15 seconds.
  • After the dwell time is complete, the indenter is removed leaving a round indent in the sample.
  • The size of the indent is determined optically by measuring two diagonals of the round indent using either a portable microscope or one that is integrated with the load application device.
  • The Brinell hardness number is a function of the test force divided by the curved surface area of the indent. The indentation is considered to be spherical with a radius equal to half the diameter of the ball. The average of the two diagonals is used in the following formula to calculate the Brinell hardness.

Brinell Formula


The Brinell number, which normally ranges from HB 50 to HB 750 for metals, will increase as the sample gets harder. Tables are available to make the calculation simple. A typical Brinell hardness is specified as follows:

356HBW

Where 356 is the calculated hardness and the W indicates that a carbide ball was used. Note- Previous standards allowed a steel ball and had an S designation. Steel balls are no longer allowed.

APPLICATIONS

Because of the wide test force range the Brinell test can be used on almost any metallic material. The part size is only limited by the testing instrument's capacity.

Strengths

One scale covers the entire hardness range, although comparable results can only be obtained if the ball size and test force relationship is the same
A wide range of test forces and b all sizes to suit every application
Nondestructive, sample can normally be reused

Weaknesses

The main drawback of the Brinell test is the need to optically measure the indent size. This requires that the test point be finished well enough to make an accurate measurement

Slow. Testing can take 30 seconds not counting the sample preparation time
 

Hardness Test

Hardness Test


Simply stated, hardness is the resistance of a material to permanent indentation. It is important to recognize that hardness is an empirical test and therefore hardness is not a material property. This is because there are several different hardness tests that will each determine a different hardness value for the same piece of material. Therefore, hardness is test method dependent and every test result has to have a label identifying the test method used.

Hardness is, however, used extensively to characterize materials and to determine if they are suitable for their intended use. All of the hardness tests described in this section involve the use of a specifically shaped indenter, significantly harder than the test sample, that is pressed into the surface of the sample using a specific force. Either the depth or size of the indent is measured to determine a hardness value.

Indenter

WHY USE A HARDNESS TEST?

  • Easy to perform
  • Quick (1-30 seconds)
  • Relatively inexpensive
  • Non-destructive
  • Finished parts can be tested - but not ruined
  • Virtually any size and shape can be tested
  • Practical QC device - incoming, outgoing

The most common uses for hardness tests is to verify the heat treatment of a part and to determine if a material has the properties necessary for its intended use. Establishing a correlation between the hardness result and the desired material property allows this, making hardness tests very useful in industrial and R&D applications.

HARDNESS SCALES


There are five major hardness scales:

  • Brinell - HB
  • Knoop - HK
  • Rockwell - HR
  • Vickers - HV


Each of these scales involve the use of a specifically shaped diamond, carbide or hardened steel indenter pressed into the material with a known force using a defined test procedure. The hardness values are determined by measuring either the depth of indenter penetration or the size of the resultant indent. All of the scales are arranged so that the hardness values determined increase as the material gets harder. The hardness values are reported using the proper symbol, HR, HV, HK, etc. indicating the test scale performed.

FIVE DETERMINING FACTORS

The following five factors can be used to determine the correct hardness test for your application

  • Material- grain size, metal, rubber etc.
  • Approximate Hardness- hardened steel, rubber etc.
  • Shape- thickness, size etc.
  • Heat Treatment- through or casehardened, annealed etc.
  • Production Requirements- sample or 100%


Bend Testing

Bend Testing

Bend testing measures the ductility of materials. Terms associated with bend testing apply to specific forms or types of materials. For example, materials specifications sometimes require that a specimen be bent to a specified inside diameter (ASTM A-360, steel products).


Bend testing provides a convenient method for characterizing the strength of the miniature components and specimens that are typical of those found in microelectronics applications. Instron® has bend and flexure fixtures available for both three and four point loading.


bend testing machines


The test method for conducting the test usually involves a specified test fixture on a universal testing machine. Details of the test preparation, conditioning, and conduct affect the test results. The sample is placed on two supporting pins a set distance apart and a third loading pin is lowered from above at a constant rate until sample failure.


The Charpy impact test

The Charpy impact test


The Charpy impact test, also known as the Charpy V-notch test, is a standardized high strain-rate test which determines the amount of energy absorbed by a material during fracture. This absorbed energy is a measure of a given material's notch toughness and acts as a tool to study temperature-dependent ductile-brittle transition. It is widely applied in industry, since it is easy to prepare and conduct and results can be obtained quickly and cheaply. A disadvantage is that some results are only comparative.

The test was developed around 1900 by S.B. Russell (1898, American) and Georges Charpy (1901, French). The test became known as the Charpy test in the early 1900s due to the technical contributions and standardization efforts by Charpy. The test was pivotal in understanding the fracture problems of ships during WWII.

Today it is utilized in many industries for testing materials, for example the construction of pressure vessels and bridges to determine how storms will affect the materials used.
In 1896 S. B. Russell introduced the idea of residual fracture energy and devised a pendulum fracture test. Russell's initial tests measured un-notched samples. In 1897 Frémont introduced a test trying to measure the same phenomenon using a spring-loaded machine. In 1901 Georges Charpy proposed a standardized method improving Russell's by introducing a redesigned pendulum, notched sample and generally giving precise specifications.

Definition

he apparatus consists of a pendulum of known mass and length that is dropped from a known height to impact a notched specimen of material. The energy transferred to the material can be inferred by comparing the difference in the height of the hammer before and after the fracture (energy absorbed by the fracture event).
The notch in the sample affects the results of the impact test,  thus it is necessary for the notch to be of regular dimensions and geometry. The size of the sample can also affect results, since the dimensions determine whether or not the material is in plane strain. This difference can greatly affect conclusions made.
The "Standard methods for Notched Bar Impact Testing of Metallic Materials" can be found in ASTM E23, ISO 148-1 or EN 10045-1, where all the aspects of the test and equipment used are described in detail.
The Charpy Impact Test is commonly used on metals, but is also applied to composites, ceramics and polymers. With the Charpy impact test one most commonly evaluates the relative toughness of a material, and as such, it is used as a quick and economical quality control device.

Charpy Sample


The standard Charpy Impact Test specimen consist of a bar of metal, or other material, 55x10x10mm having a notch machined across one of the larger dimensions.

V-notch: 2mm deep, with 45° angle and 0.25mm radius along the base
U-notch and keyhole notch: 5mm deep notch with 1mm radius at base of notch

Sample sizes

According to ASTM A370, the standard specimen size for Charpy impact testing is 10 mm × 10mm × 55mm. Subsize specimen sizes are: 10 mm × 7.5 mm × 55mm, 10 mm × 6.7 mm × 55 mm, 10 mm × 5 mm × 55 mm, 10 mm × 3.3 mm × 55 mm, 10 mm × 2.5 mm × 55 mm. Details of specimens as per ASTM A370 (Standard Test Method and Definitions for Mechanical Testing of Steel Products).

According to EN 10045-1, standard specimen sizes are 10 mm × 10 mm × 55 mm. Subsize specimens are: 10 mm × 7.5 mm × 55 mm and 10 mm × 5 mm × 55 mm.


According to ISO 148, standard specimen sizes are 10 mm × 10 mm × 55 mm. Subsize specimens are: 10 mm × 7.5 mm × 55 mm, 10 mm × 5 mm × 55 mm and 10 mm × 2.5 mm × 55mm.

Quantitative results
The quantitative result of the impact tests the energy needed to fracture a material and can be used to measure the toughness of the material. There is a connection to the yield strength but it cannot be expressed by a standard formula. Also, the strain rate may be studied and analyzed for its effect on fracture.

The ductile-brittle transition temperature (DBTT) may be derived from the temperature where the energy needed to fracture the material drastically changes. However, in practice there is no sharp transition and it is difficult to obtain a precise transition temperature (it is really a transition region). An exact DBTT may be empirically derived in many ways: a specific absorbed energy, change in aspect of fracture (such as 50% of the area is cleavage), etc.

Qualitative results

The qualitative results of the impact test can be used to determine the ductility of a material. If the material breaks on a flat plane, the fracture was brittle, and if the material breaks with jagged edges or shear lips, then the fracture was ductile. Usually a material does not break in just one way or the other, and thus comparing the jagged to flat surface areas of the fracture will give an estimate of the percentage of ductile and brittle fracture.

WHY IS IMPACT TESTING IMPORTANT?

Impact resistance is one of the most important properties for a part designer to consider, and without question, the most difficult to quantify. The impact resistance of a part is, in many applications, a critical measure of service life. More importantly these days, it involves the perplexing problem of product safety and liability.
One must determine:

1.The impact energies the part can be expected to see in its lifetime
2. The type of impact that will deliver that energy, and then
3. Select a material that will resist such assaults over the projected life span

Molded-in stresses, polymer orientation, weak spots (e.g. weld lines or gate areas), and part geometry will affect impact performance. Impact properties also change when additives, e.g. coloring agents, are added to plastics.
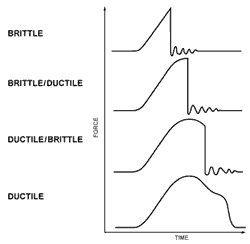

DUCTILE VS. BRITTLE

Most real world impacts are biaxial rather than unidirectional.

Further complication is offered by the choice of failure modes: ductile or brittle. Brittle materials take little energy to start a crack, little more to propagate it to a shattering climax. Other materials possess ductility to varying degrees. Highly ductile materials fail by puncture in drop weight testing and require a high energy load to initiate and propagate the crack.

Many materials are capable of either ductile or brittle failure, depending upon the type of test and rate and temperature conditions. They possess a ductile/brittle transition that actually shifts according to these variables.